Wednesday, February 29, 2012
Tuesday, February 21, 2012
DIY RingLight
We always have a bunch of unused boxes stacked around the apartment and since I was inspired by so much DIY stuff circulating online I knew I had to something from scratch. So my DIY moment came at 1:30am, a very conducive time for making things. I was feeling kinda like Alodia G. not sleeping until something gets done except it was not a cosplay costume. Photography is one of my "on and off" hobby, I mostly like doing portraits which mainly displays headshots with makeup. So I am hoping that this might be a good addition to my tools or this might be a fail who knows HA! But it is worth a try considering the success rate and almost no cost investment these DIY stuff promises.
So, I have decided to built a ring light. I built my ring light from cardboard boxes, a car reflector and a bunch of different tapes and of course the light source; a ring-shaped fluorescent w/ ballast. Lesson learned on tapes, use
Wednesday, February 15, 2012
Smokey Cat Eyes
Nikki
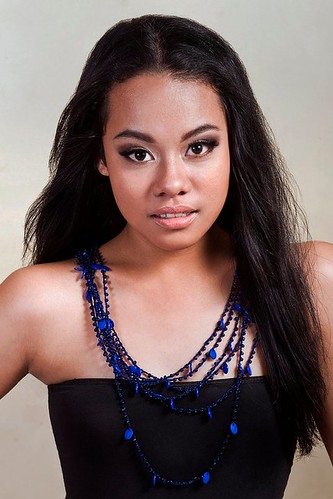
Here is my take on the smokey cat eyes. First off, let me just say that Nikki has very mesmerizing eyes, I was excited to make her up because I know it would compliment this look. Plus this lass knows how to "work it" in front of the camera. Let me ask you, who doesn't love smokey eyes? A lot of girls are intimidated when doing this look. This smokey-eyed look has grown into massive popularity as it is no longer limited to the blacks and greys, it's neutral counterparts have become widely used. When done right, this can be a very sexy and flattering look; when done wrong, this can look like a big black eye or you can end up looking like a raccoon 8-)
Did I mention that there are over 100,000 (bit exaggerated number) how-to-videos on Youtube, to aide you in getting the perfect smokey look for your eye shape.
The trick here is to know how to blend and smudge!
I won't bore you with the details on how to get this look, I personally prefer to watch video tutorials rather than read the steps on how to get this look. ( LOL ) The trick here is to know how to blend and smudge! Use a primer to make sure that the product adheres to your skin better.
Use a concealer underneath the eyes and over the top of the lids. The tone under and on the eyelids tend to be a bit dark than the rest of the face. A concealer is a very powerful product for everyday use to give you that rested look even when you just woke up from a hangover.
Do remember to curl your eyelashes, apply a generous amount of mascara or apply some false eyelashes to complete the look.
I will soon be posting the products I used for this pictorial.
Monday, February 13, 2012
Red Lips
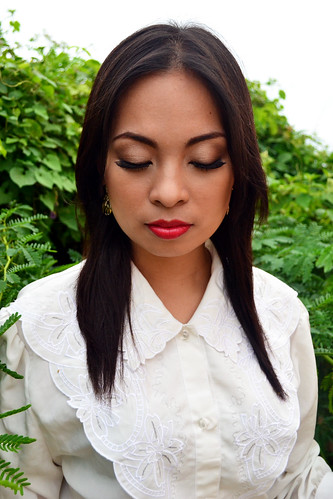
This was quite a shoot! It has been quite sometime that me and my officemates have been planning to do a glamour/ fashion shoot just for the heck of it. We are still new to planning photoshoots and there we're quite a few things that had gone wrong =D hahahaha but it was well worth the experience. Jona, had two costume changes but had one look all throughout the pictorial. I personally pick these headshots for you to see the effect of the products used up close.
I chose neutral colors for the eyes to compliment with the strong red lips and used some lush false eyelashes to add something extra special to this shoot.
Here, I used Stila Cosmetics Surprise and Shine Record a Message Palette (hahahaha quite a long product name). The kit itself comes with three eye shadows Nude, Wheat and Espresso and a Convertible Color in Peony which can be used for the cheeks and lips. These compact type makeups are very practical for those that are always on the go but don't want to sacrifice their look. It can be your one stop shop to looking fabulous.
To start, I used a combination of cream and liquid foundation. I kept it very minimal because I wanted her skin to show through and a bit of concelear to hide imperfections. On her eyes, I used Wheat as base on her eyelids, swept some Bronze from Loreal's Beige Harmony quad on top of the base and used Espresso on the Stila palette to draw in some contour. For Jona's lips, I used Revlon's In the Red matte lipstick and some VS lip shine to do away with her lips looking flat.
photo courtesy of sephora.com
Stylist: Dan Malinao http://iamdanny-girl.blogspot.com/
Make-up: Aura Mae Alturas http://www.flickr.com/photos/maealturas/
Co-photographer: PeeJay Cadungog http://www.flickr.com/photos/tirapasagad/
Happy Valentines Day
~Aura~
Labels:
eyeshadow,
L’Oreal Paris’,
lipstick,
Loreal,
mae alturas,
makeup,
Revlon,
Stila
Friday, February 10, 2012
Party Rockin'
The product used on Angel's eyes is the Open Eyes Pro: Eyeshadow Quads in GREY HARMONY
Open Eyes Pro is L’Oreal Paris’ new technological breakthrough for
creating the perfect eye look. Created using the wet process technology,
colors now adhere better to the skin. They now last longer and have a
better shiny effect.
 | |
| Photo Credit :goayjl.files.wordpress.com |
I liked how this turned out on the picture especially the translucent effect on the highlights. The intense colors will transform your eyes dramatically. The quad that I picked out for this shoot is a gradient of grey tones. I also like the fact that this has a step-by-step guide at the back of the product to help you use it. I got this at Watsons Ayala Center Cebu and is available with different set of colors to choose from.
I want to thank my hubby for taking this shot and for volunteering his sister Angel to be my canvas.
Subscribe to:
Comments (Atom)


